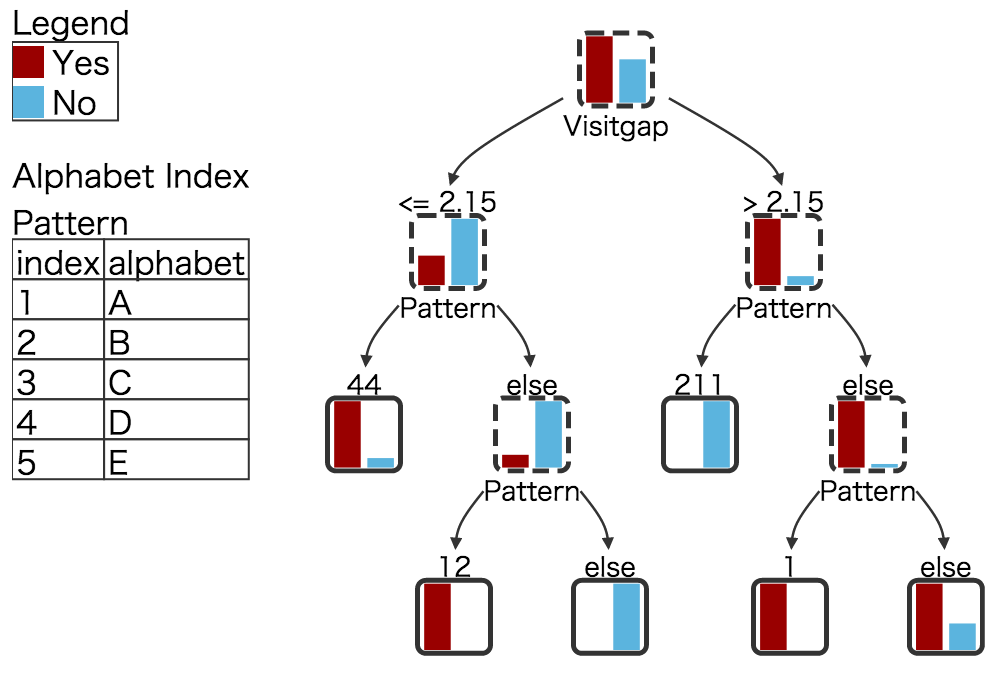
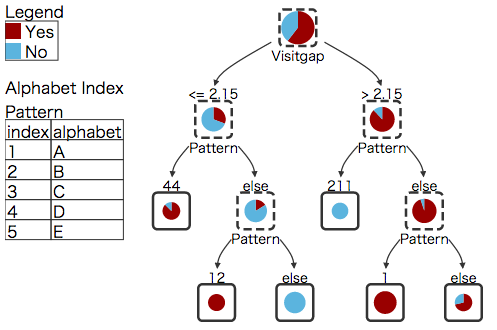
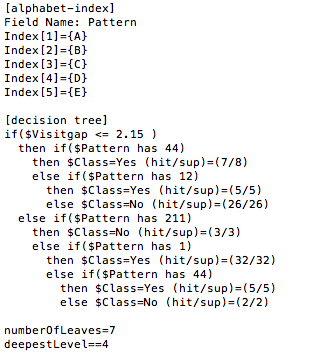
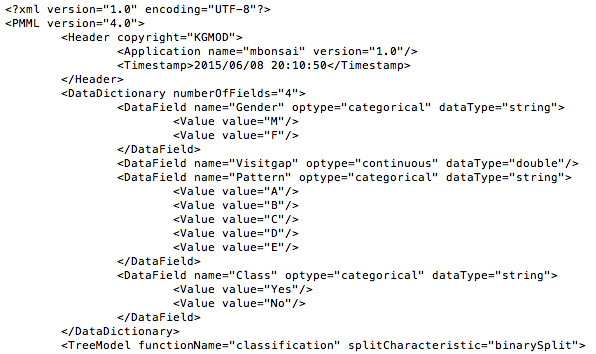
mbonsai is an open sourced decision tree software. It lightweight and powerful which can be executable at command line. The software reads CSV input data and creates a decision tree model in text and pmml format. This package includes a tool known as mdtree.rb to visualize the decision tree model as SVG graphic. This version is a standalone release, mbonsai is also available as part of the NYSOL open sourced data mining package.
Works on:
mbonsai.zip– current release on July 2017 Updated on Aug. 30th
Installation package is compatible for Mac OS X and Linux operating systems listed above. Please note that the software may require prior installation of gcc and G++ compiler, Ruby, C++ boost library, and libxml2 depending on the OS. Download the latest version of mbonsai in the link under Download above.
Follow the steps below to compile and install prerequisite libraries from source code.
In Mac environment, development tools such as g++ and development tools are not installed with the system, therefore, Xcode is required prior to the installation of nysol.
Download and install xcode from the following URL.
https://developer.apple.com/xcode/
After installing xcode, install the Command Line Tools from xcode. Latest version of Xcode can also be installed through App Store. Please refer to Apple’s latest documentation.
To confirm the installation of command line tools, type “gcc” at the command prompt.
In Linux environment, ensure gcc and g++ compilers, and libtool are installed in the system.
Please install the build-essential package, which will also install GNU make.
Please refer to the references related to corresponding OS for the installation of the required tools.
| $ sudo apt-get update
$ sudo apt-get install build-essential |
Download and install C++ boost library. Linux 32 bit OS environment, follow the installation steps below. It takes about 30 minutes to install the boost library.
|
$ sudo apt-get install libxml2-dev |
In Mac environment, apt-get is not available. Follow the installation steps below to use Homebrew or source code install.
At the terminal, type the following for Homebrew install:
| $ ruby -e “$(curl -fsSL https://raw.githubusercontent.com/Homebrew/install/master/install)” < /dev/null 2> /dev/null
$ brew install boost |
Alternatively, Boost can be installed with source code. Follow the steps below to download boost version 1.52 or later.
|
# 32-bit OS environment $ wget http://sourceforge.net/projects/boost/files/boost/1.52.0/boost_1_52_0.tar.gz/download $ tar zxvf boost_1_52_0.tar.gz $ cd boost_1_52_0 $ ./bootstrap.sh $ ./bjam $ sudo ./bjam install
# 64 bit OS environment $ wget http://sourceforge.net/projects/boost/files/boost/1.52.0/boost_1_52_0.tar.gz/download $ tar zxvf boost_1_52_0.tar.gz $ cd boost_1_52_0 $ ./bootstrap.sh $ ./bjam cflags=-fPIC $ sudo ./bjam install cflags=-fPIC |
Mac Mavericks and Yosemite OS contains libxml2 libraries in the stock Mac machine, therefore this installation procedure can be omitted. However, if your system is upgraded from version 10.8 or earlier OS X to Mavericks version 10.9 or Yosemite version 10.10, the following installation is required. Check if libxml2.dylib and libxslt.dylib exists in /usr/lib folder, if not, it is necessary to install the libraries.
Linux users may require python-dev to be installed before libxml2 as follows.
|
$ sudo apt-get install libxml2-dev |
Mac users may install libxml2 through Homebrew as follows:
|
$ brew install libxml2 |
Alternatively, libxml2 and libxslt binary source packages can be downloaded from the xmlsoft website.
Install libxml2:
|
$ tar zxvf libxml2-2.9.2.tar.gz $ cd libxml2-2.9.2 $ ./configure $ make $ sudo make install
# if libxml2 is installed in /usr/local/include directory, link the directory to /usr/include as follows: $ sudo ln -s /usr/local/include/libxml2 /usr/include/libxml2 |
Ruby is preinstalled in Mac OS, however, Linux users may need to install Ruby. First, check the install of Ruby with the command below, if Ruby is not present install Ruby with apt-get.
Note: There may be incompatibility issues with rvm. Installation through apt-get or source code compile is recommended.
|
# check install of Ruby with the command below: $ ruby -v |
|
$ sudo apt-get install ruby ruby-dev |
For Ubuntu 12.x users, there is an option to install Ruby 1.8 or 1.9.1, please install 1.9.1 through apt-get.
|
$ sudo apt-get install ruby1.9.1 ruby1.9.1-dev |
After all required software have been installed, extract mbonsai.zip (or name of updated archive) to a desired directory, then follow the steps below to compile and install mbonsai. The “Makefile” in “mbonsai/cmd” directory describes the compilation and installation of all libraries for mbonsai.
|
$ unzip mbonsai.zip
g++ -I . -I lib -I/usr/include/libxml2 -c -o lib/kgArgFld.o lib/kgArgFld.cpp |
After mbonsai is successfully compiled, go to “mbonsai/check” directory, and follow the steps below to test mbonsai. Sample output is saved in outdat directory.
|
$ cd mbonsai/check
ABCDE = 12345 *improved(errev:0.037037 *improved(errMin:0,leaf:1) |